Category: Blog Hops

  • Around the World on Wednesday: Let’s Celebrate

    Can you believe it? I’m back hopping with the wonderfully talented Around the World on Wednesday Blog Hop group.

    You’ve probably come here from our fearless leader, Angie MacKenzie’s blog. I’m Chris Smith and if you are relatively new to following this hop I haven’t been around much recently. I’ve had to rebuild my blog at the same time that I am re-envisioning my stamping as that of more of a hobby/”sort of but not exactly retired” demonstrator. From my view it’s kind of the best of both worlds. I still get to preview all the yummy new stuff but the old favorites are out of storage and back on my craft room shelves too!

    Anyway, I really wanted to get in on this hop because the theme is Let’s Celebrate and one of my favorite things in the new catalog the Balloon Festoon Bundle. In particular, the dies! I actually shopped around before ordering to make sure I couldn’t find balloon dies I liked better. I wanted classic balloons, not gimmicks, and in many sizes and boy do these deliver!

    I’ve been having so much fun playing and I want to share my favorite way – so far – of using the Balloon Festoon Dies, and bundle: creating masks or stencils and using them with the blending brushes.

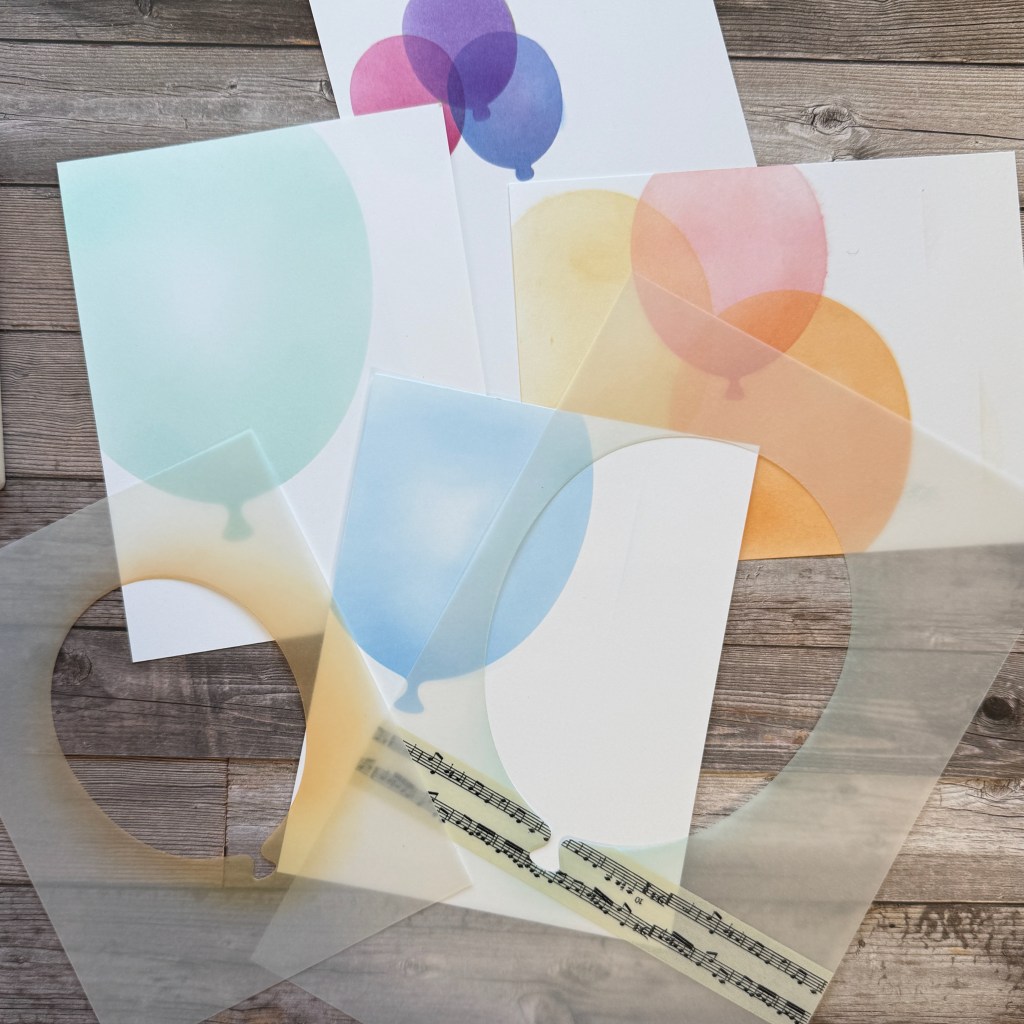
    My initial masks were just card from sized pieces of vellum each with one balloon cut out of each of them. I had a couple of problems. First, I quickly bent the area where the balloon tie is so I started adding a piece of regular or wash tape right under the tie part of the die cut so that this held up to my brush a little better. Second, I made each mask a full 6″x6″. My brush had strayed beyond the edge of the mask a few times and I needed to sure fire way to prevent that. Now they look like this:

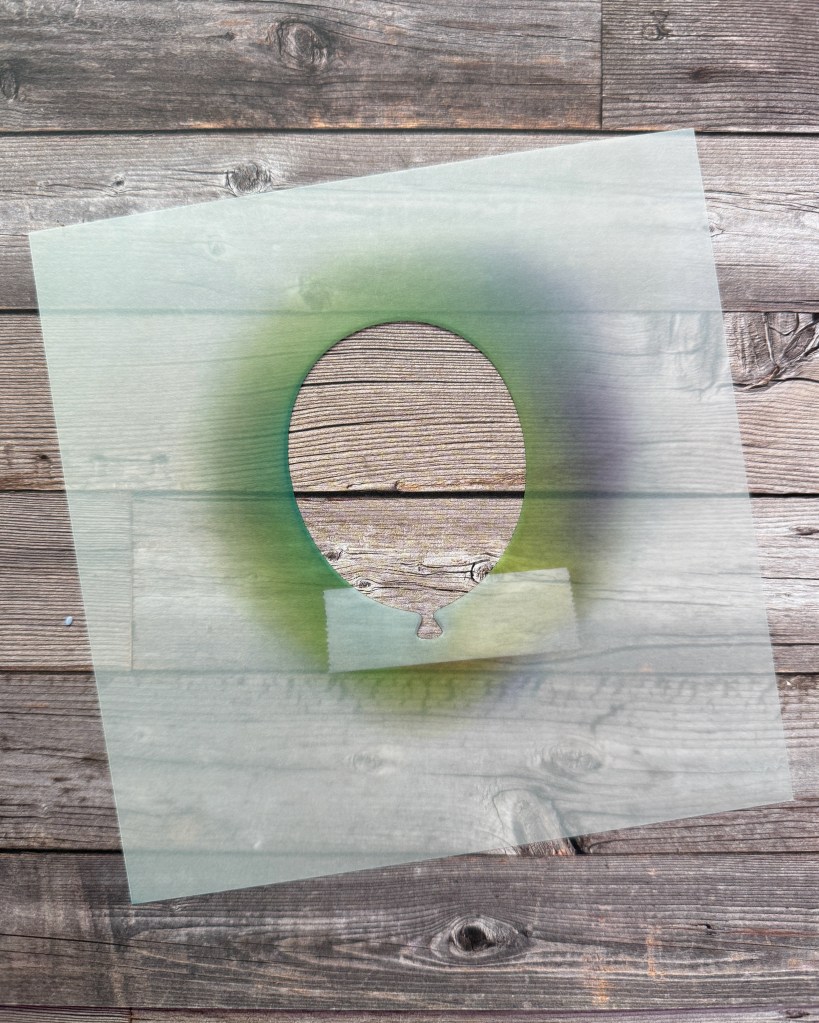
    As you can see they do get inky! Between colors I usually wipe off any excess ink with a tissue, just until the tissue doesn’t pick much up any more. Here is the card that I made with blue/green mask:

    These balloons get along with SO many other sets! I used the little Birds from and Cutest Crew Bundle along with the new Words & Wishes. I used Azure Afternoon and Lemon Lime Twist on these balloons and the “Happy” die cut.

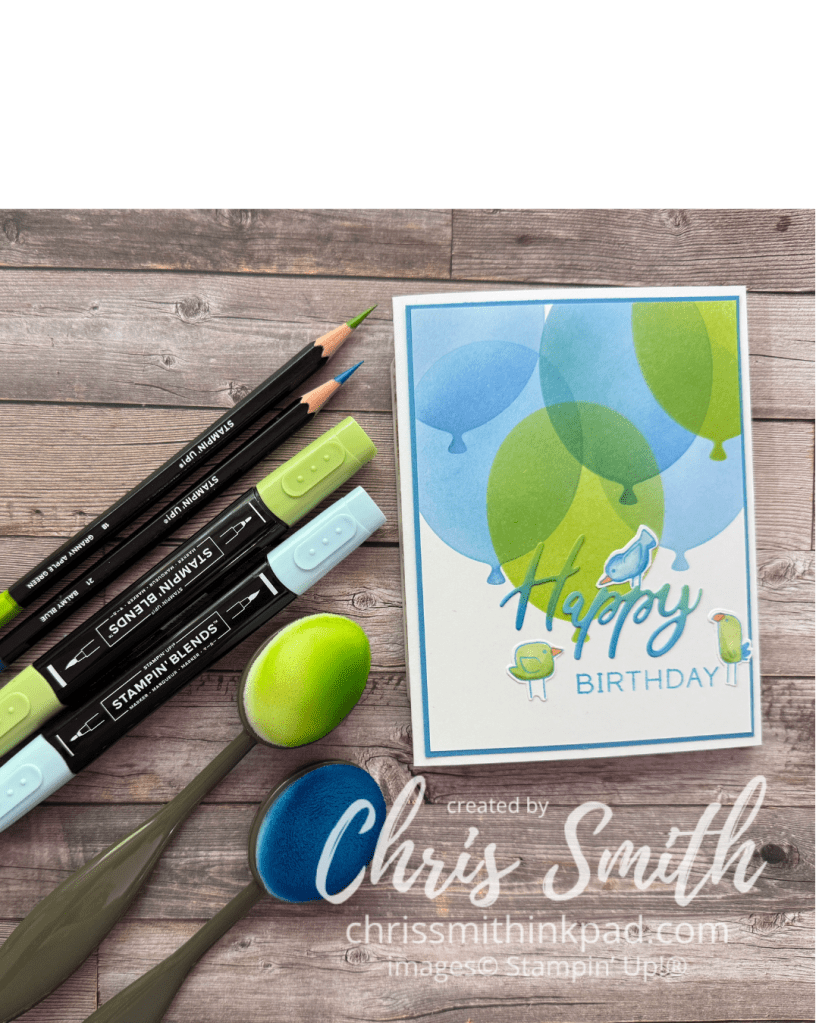
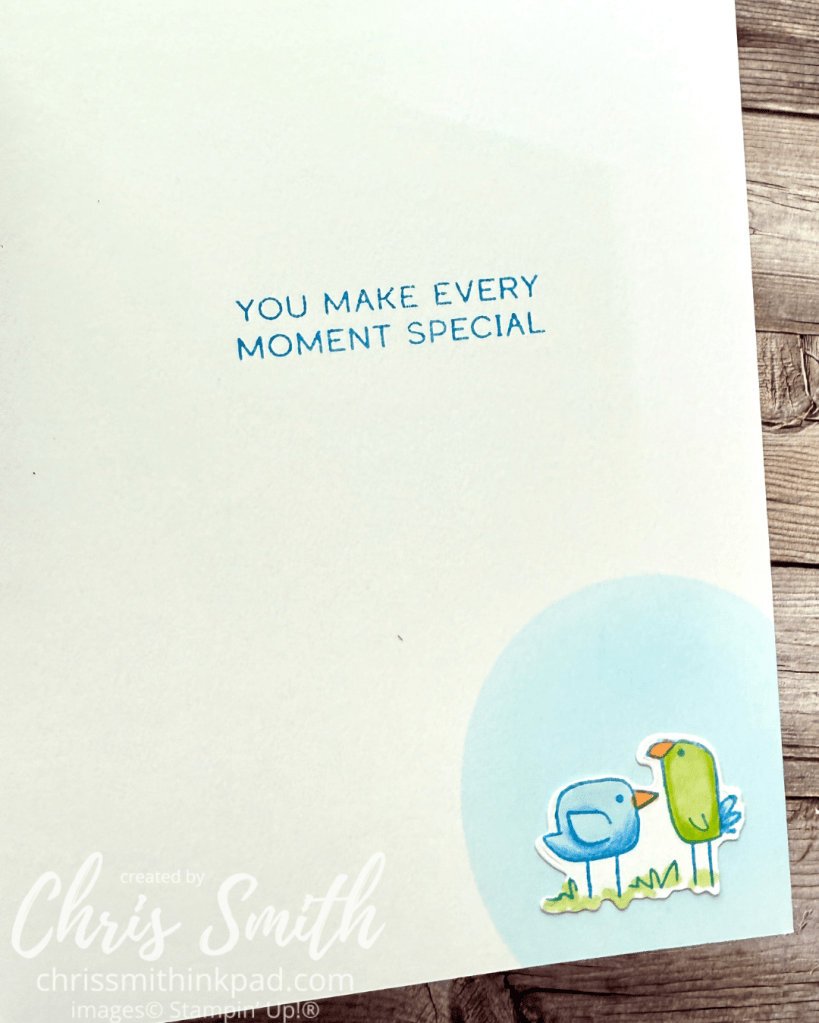
    I love using a bit of the Blends Alcohol Markers to give a quick wash of color and then do my shading with the watercolor pencils. Did you notice how sharp the pencils are – I’m taking a colored pencil class and I’m learning how much more you can do with really sharp pencils! Here are a few more birds on the inside of the card:

    One more note about using these balloon masks or stencils – because I really want you to have fun using these. I know I mentioned wiping off excess ink between colors. While this IS important when you are trying to keep your colors crisp and distinct there are always times to break the rules when you are doing art, right? So if you don’t clean them off every time you still might get something you love.

    This card is made from balloons I did with the smallest balloon stencil. I was cleaning off a bunch of brushes and I didn’t wipe the stencil between colors. Once I realized I forgot to wipe off the stencil I thought I was going to end up with a bunch of muddy balloons but it was quite the opposite. The colors seemed to take on each other and they became so harmonious.

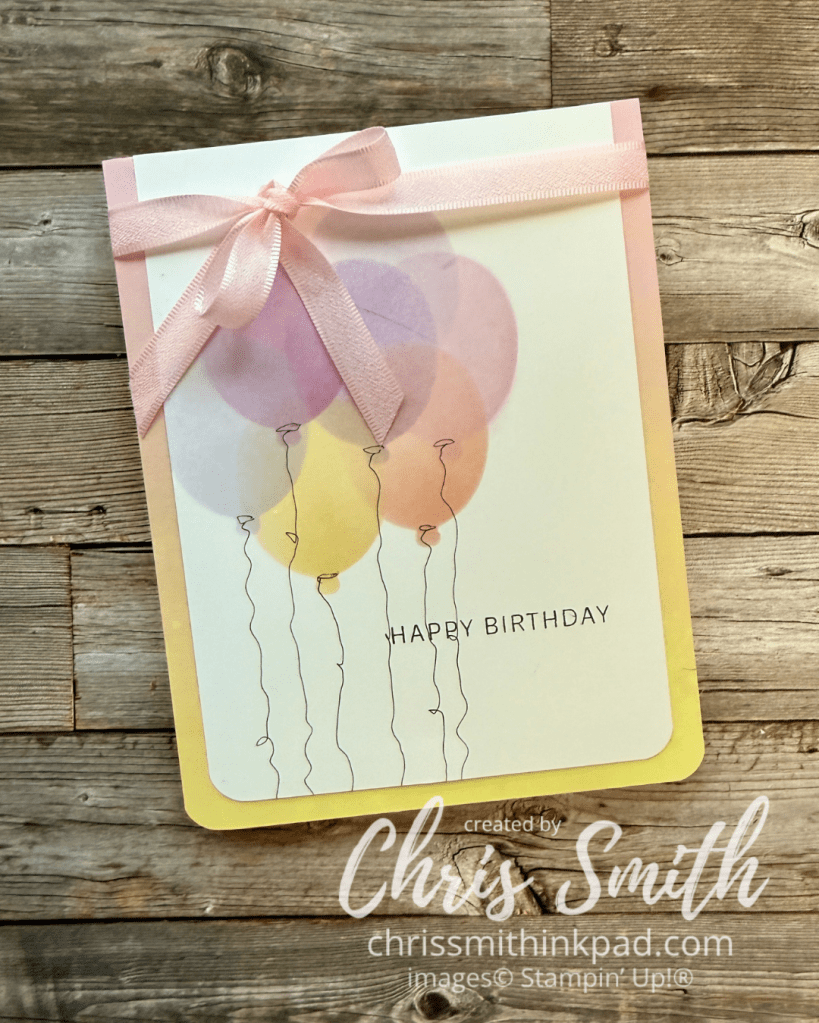
    I found a piece of Beach Boardwalk Designer Series Paper that set the balloons off perfectly, drew some strings and stamped a tiny birthday greeting from Lovely Arrangements. Ribbon is the new In Color, Barely Blush.

    Enough from me. Next up is the uber talented, Jan Clothier.

    Jan Clothier – NZ

    Leonie Stuart – AU

    Rochelle Laird-Smith – AU

    Cheryll Miller – AU

    Marga Bultena – DE

    Kim Fee – UK

    Angie McKenzie – US

    Chris Smith – US

  • Around the World on Wednesday: This or That

    Can you believe it’s November already?

    This month’s Around the World on Wednesday Blog hop Theme is This or That: Wrapped in Gratitude taking special inspiration from the beautiful creations of team member, Sharon Burkert.

    I chose to take inspiration from this colorful Halloween card of Sharon’s that features the Party Alphabet Dies:

    The dies are new to me and I thought it would be fun to use the pumpkin and vine theme with them. Since I’m going for a fall gratefulness theme I worked with the big dies and Beautiful Pumpkin Bundle. I also used the Gathering Moments fall images and even pulled in a tag and greeting from the Layers of Beauty bundle. These are big dies, big enough to actually stamp on the die cuts. There are also so big that I knew my card would be a slim line card just to get the word “THANK” on it.

    • I started by stamping the rather fall like botanical images from Gathering Moments along one long side of a sheet of Very Vanilla card stock. I used Old Olive, Pecan Pie, Berry Burst. I wanted to pull in a darker echo of Sharon’s Petunia Pop and I like the way this puts a little twist on the more traditional colors. There is a bit of Cajun Craze with the mushroom image too.
    • The next time I try this I might just die cut the letters first and then stamp as I needed to add more images to the die cuts anyway.
    • Once I had the stamping on the letters done I put them all into Birch Wood embossing folder to add a bit of texture.
    • After trying a few embossed designs on the Pecan Pie layer, I decided this would look better just plain. I used a ruler to make a straight ledge to line up the letters and stated with the “A” in the middle and work out to the edges. After the fact I decided to push this a little more in the shabby chic direction by lightly brushing the letters with just a touch of Pecan Pie and roughing up the corners.
    • I tried adding a Pumpkin Pie or Cajun Craze pumpkin but in the end decided to play up the Berry Burst a little more. The image is stamped in Cajun Craze on Berry Burst card stock and then it was brushed with a little more Berry Burst after die cutting it. I like the vintage velvety look this gave it and actually ordered this bundle because I thought it would be fun to do some non-traditional pumpkins. The pumpkin vines/leaves were ie cut with Beautiful Pumpkins Dies out of Old Olive card stock and them brushed with a little Pecan Pie around the edges. Before attaching the Pecan Pie layer (3 1/4″ x 8 1/2″) to Berry Burst (3 3/8″ x 8 5/8″) I brushed those edges too.
    • Before attaching this all to the 3 5/8″ x 8 7/8″ Old Olive card baseI tied some linen thread around the THANKS layer and added a “you” tag made with the Layered with Beauty Bundle.

    Here is a close up of the pumpkin:

    This was a really fun first go at these alphabet dies and I look forward to playing with them again soon.

    I’m trying to prep for two back to back trips amid the uncertainty of US air travel right now so I ended up skipping my planned second card. – I was going tweak the colors for a less shabby chic look. But that means you get to move on to see what you will see with the others on this hop. I can’t wait to see what Teri West has in store for us.

    Jan Clothier – NZ
    Leonie Stuart – AU
    Rochelle Laird-Smith – AU
    Cheryll Miller – AU
    Danielle Kassing – NL
    Marga Bultena – NL
    Aurélie Fabre – FR
    Kelly Taranto – US
    Sharon Hashimoto Burkert
    Chris Smith – US
    Teri West – US

    Thanks so much for stopping by. I hope you enjoy the blog hop!